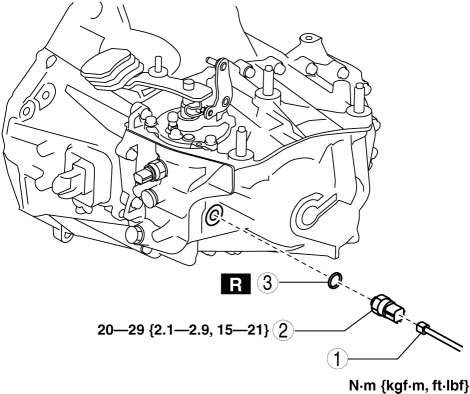
Mazda 3 Service Manual: Back Up Light Switch Removal/Installation [C66 M R]
1. Remove the battery cover..
2. Disconnect the negative battery cable..
3. Remove the aerodynamic under cover No.2..
4. Remove in the order indicated in the table.
5. Install in the reverse order of removal.
|
1 |
Back-up light switch connector |
|
2 |
Back-up light switch |
|
3 |
Gasket |
 Back Up Light Switch Removal/Installation [A26 M R]
1. Disconnect the negative battery cable.
2. Disconnect the back-up light switch connector.
3. Remove the aerodynamic under cover No.2..
4. Remove the back-up light switch with the gasket.
...
 Back Up Light Switch Removal/Installation [G35 M R]
1. Remove the battery cover..
2. Disconnect the negative battery cable.
3. Remove the battery component. (ex: battery, battery tray and PCM component).
4. Remove the aerodynamic under cover No. ...
Other materials:
Using LATCH Lower Anchor
Your Mazda is equipped with LATCH lower anchors for attachment of specially
designed
LATCH child-restraint systems in the rear seats. Both anchors must be used,
otherwise the
seat will bounce around and put the child in danger. Most LATCH child-restraint
systems
must also be used in conjunc ...
Front Bumper Reinforcement Removal/Installation
1. Disconnect the negative battery cable..
2. Remove the following parts:
a. Front bumper.
b. Seal plate.
3. Remove the bolts A.
4. Remove the bolts B.
5. Remove the front bumper reinforcement.
6. Install in the reverse order of removal. ...
Drive Belt Auto Tensioner Inspection [Skyactiv G 2.0]
WARNING:
A hot engine can cause severe burns. Turn off the engine and wait until it
is cool before servicing.
CAUTION:
If the rubber part of the drive belt auto tensioner is damaged by a screwdriver
or other tool, oil in the hydraulic pressure unit could leak and the tens ...
