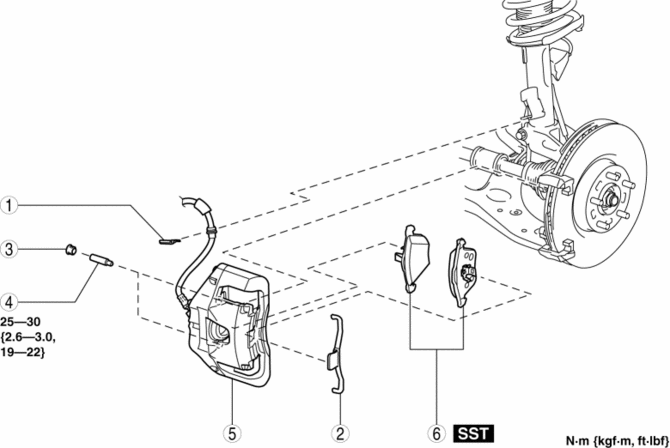
Mazda 3 Service Manual: Disc Pad (Front) Replacement [Mzr 2.3 Disi Turbo]
1. Remove in the order indicated in the table.
2. Install in the reverse order of removal.
3. After installation, pump the brake pedal a few times and verify that the brakes do not drag.
|
1 |
Clip |
|
2 |
Retaining clip (See FRONT BRAKE (DISC) REMOVAL/INSTALLATION [MZR 2.3 DISI Turbo].) |
|
3 |
Cap |
|
4 |
Bolt |
|
5 |
Caliper |
|
6 |
Disc pad (See FRONT BRAKE (DISC) REMOVAL/INSTALLATION [MZR 2.3 DISI Turbo].) |
 Disc Pad (Front) Replacement [Mzr 2.0, Skyactiv G 2.0, Mzr 2.5]
1. Remove in the order indicated in the table.
2. Install in the reverse order of removal.
3. After installation, pump the brake pedal a few times and verify that the brakes
do not drag.
...
 Disc Pad (Rear) Replacement
1. Remove in the order indicated in the table.
2. Install in the reverse order of removal.
3. After installation, pump the brake pedal a few times and inspect the following:
Parking brake ...
Other materials:
Clock
Setting the time
The clock can be set at any time when the
ignition is switched to ACC or ON.
To adjust the time, press the clock
button ( ) for about 2 seconds
until
a beep is heard.
The clock's current time will flash.
Time adjustment
To adjust the time, press the hour/
...
Luggage Compartment
Luggage compartment cover (5-door)
WARNING
Do not place anything on top of the
cover:
Placing luggage or other cargo on top
of the luggage compartment cover is
dangerous. During sudden braking or
a collision, the cargo could become
a projectile that could hit and injure
...
Crankshaft Position (CKP) Sensor Inspection [Mzr 2.0, Mzr 2.5]
Visual Inspection
CAUTION:
When foreign material such as an iron chip is on the CKP sensor, it can cause
abnormal output from the sensor because of flux turbulence and adversely affect
the engine control. Be sure there is no foreign material on the CKP sensor when
replacing.
...
