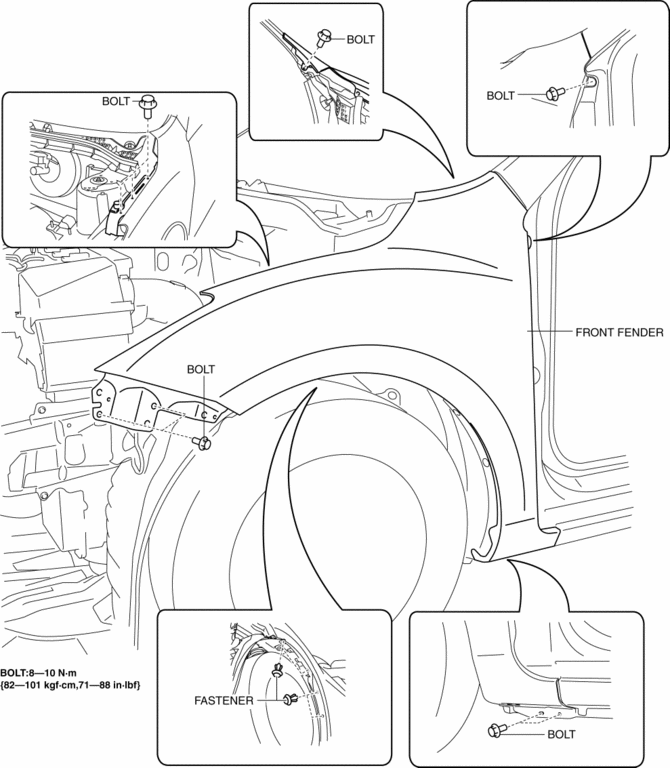
Mazda 3 Service Manual: Front Fender Panel Removal/Installation
1. Disconnect the negative battery cable..
2. Remove the following parts:
a. Front bumper.
b. Front combination light.
c. Front fender molding.
d. Side step molding.
3. Remove fasteners and bolts, then remove the front fender panel in the direction of the arrow shown in the figure.

4. Install in the reverse order of removal.
5. Adjust the headlight aiming..
 Front Bumper Removal/Installation
1. Disconnect the negative battery cable..
2. Remove the screw A and fasteners B.
3. Remove the screws C.
4. Remove the bolts D.
5. Remove the fasteners E, screw F and fastener G. ...
 Front Mudguard Removal/Installation
1. Remove screw A, fasteners B, screws C, fasteners D, and E.
2. Remove the front mudguard in the direction of the arrow shown in the figure.
3. Install in the reverse order of removal. ...
Other materials:
SRS Air Bag Deployment Criteria
This chart indicates the applicable SRS equipment that will deploy depending
on the type of
collision.
(The illustrations are the representative cases of collisions.)
X: The SRS air bag equipment is designed to deploy in a collision.
*1 (With Front Passenger Occupant Classification Syste ...
Wiper Blades
CAUTION
Hot waxes applied by automatic car
washers have been known to aff ect the
wiper's ability to clean windows.
To prevent damage to the wiper blades,
do not use gasoline, kerosene, paint
thinner, or other solvents on or near
them.
When the wiper lever is i ...
Headliner Removal/Installation
1. Shift to the D (ATX) or 4th gear (MTX) position. (4SD)
2. Disconnect the negative battery cable..
3. Remove the rain sensor cover. (Vehicles with auto light/wiper system).
4. Disconnect the rain sensor connector. (Vehicles with auto light/wiper system)
5. Partially peel back the seaming ...
